12 Button Crafts and Repurpose Ideas: A comprehensive Guide
Ever looked at a pile of colourful buttons in all shapes and sizes and thought, “What can I do with these?” Maybe you’ve inherited a tin of them from a loved one or found yourself collecting them over time. Whatever the reason, before you toss them away, take a moment to imagine the possibilities. Buttons aren’t just for sewing; they’re tiny treasures waiting to be transformed into something extraordinary.
In this guide, we’ll explore a world of creative, practical, and fun ways to repurpose buttons. Whether you’re a seasoned crafter or someone new to DIY projects, there’s something here for you. From making whimsical decorations like button globes and rainbow art to functional items like fridge magnets and bookmarks, the options are endless. These projects not only help you breathe new life into unused buttons but also promote sustainability and mindful crafting.
So, roll up your sleeves and dive into these button crafts and repurpose ideas. By the end of this journey, you’ll see buttons in a whole new light—as building blocks for creativity, storytelling, and even cherished memories. Let’s get started and turn those simple buttons into something truly special.
In This Article
- 1. Button Globe
- 2. Button Headband
- 3. Halloween Button Crafts
- 4. Coin Charms
- 5. Wax Seal Stamps
- 6. Quick Bookmarks
- 7. Button Tree
- 8. Rainbow Button Craft
- 9. Spooky Button Skull
- 10. Christmas Tree
- 11. Tool Holders
- 12. Button Fridge Magnets
Why Button Crafts?
Buttons are not just for holding clothes together; they have so much creative potential! Whether you have a stash from old shirts or a random collection from thrift store finds, buttons can be transformed into amazing crafts that are fun, functional, and full of character.
One of the best things about button crafts is how affordable they are. Buttons are easy to come by—dig through your sewing kit, check thrift shops, or even ask friends and family to donate their extras. It’s a low-cost way to dive into crafting.
Button projects are also great for the planet. Instead of tossing them out or letting them gather dust, you’re giving these little pieces a new life. By repurposing buttons, you’re reducing waste and supporting upcycling—a win for sustainability!
And let’s not forget how versatile buttons are. They’re perfect for everything from simple kids’ crafts to elegant home decor. You can create bookmarks, jewellery, wall art, and more, making them a go-to material for crafters of all ages.
In fact, a 2023 survey found that 72% of crafters love button projects for their mix of creativity and sustainability. Ready to get inspired? Let’s dive into the possibilities!
Button Crafts and Repurpose Ideas
1. Button Globe
If you’ve ever dreamed of holding the world in your hands—quite literally—the Button Globe craft is for you. This project combines creativity with a touch of geography, making it perfect for craft enthusiasts who love detailed, meaningful decor. While this may not be the easiest project on the list, the results are stunning and well worth the effort. Let’s dive into the process, step by step.
What You’ll Need:
- Foam ball: The foundation of your globe.
- Acrylic paints: Blue for oceans and green for continents.
- Bamboo skewers: To create an axis for your globe.
- Assorted buttons: Blue and green for oceans and land.
- Strong adhesive: To keep those buttons in place.
How to Create Your Button Globe:
- Prep and Paint: Start with your foam ball. Paint the entire surface blue—this will represent the oceans. Once the blue paint dries, it’s time to outline the continents. Use a reference like a printed world map or a globe to trace the continents with green paint. Don’t worry if it’s not perfect; handmade charm is part of the appeal.
- Glue the Buttons: Once the paint is completely dry, begin attaching your buttons. Use green buttons for the continents and blue buttons for the oceans. To create a realistic effect, use buttons of various sizes. Larger buttons can fill bigger areas, while smaller buttons work for detailing the edges of continents.
- Add the Axis: Insert bamboo skewers through the foam ball to create a stand or axis. This is optional, but it’s a nice touch if you want to display your globe upright.
Why It’s Special:
Rachel Moore, a craft educator, shares her insight: “Using buttons of different textures and sizes adds depth to the project, making it look more dynamic and engaging.”
This craft not only makes for a beautiful home decor piece but also serves as an educational tool for kids. Imagine teaching geography with a tactile, handmade globe!
Learn More: 10 Eco-Friendly Crafts for Adults to Inspire Sustainability
2. Button Headband
Let’s switch gears to a craft that’s quick, easy, and fun for all ages: the Button Headband. Whether you’re personalising an accessory for yourself or helping kids unleash their creativity, this project is a guaranteed hit.
Materials Needed:
- Elastic headband: You can repurpose an old one or buy a new.
- Buttons: Any colours or sizes that suit your style.
- Needle and thread or hot glue: Choose your preferred method for attaching buttons.
Steps to Make Your Headband:
- Plan Your Design: Before attaching anything, lay out your buttons on the headband to decide on the pattern. Do you want a rainbow of colours, a single shade, or a mix of shapes? The choice is yours.
- Attach the Buttons: Use a needle and thread to sew the buttons securely onto the fabric. If sewing isn’t your thing, hot glue works just as well for most headbands.
- Finish and Wear: Allow the glue to dry (if using) before wearing your masterpiece.
A Personal Story:
On a particularly rainy afternoon, my niece Lily and I sat down to make button headbands. Lily chose pink and purple buttons, arranging them in neat rows. It took her less than an hour, and she was thrilled with the result. The next day, she proudly wore her creation to school, earning compliments from her friends and teachers alike. It’s moments like these that make crafting truly special.
3. Halloween Button Crafts
With Halloween around the corner, why not get a little spooky with your crafting? Button ghosts are a simple, creative way to add festive flair to your decor. Plus, this project is easy enough for kids to handle with minimal supervision.
Supplies Needed:
- Thread cones: These will form the base of your ghost.
- White thread: To wrap around the cones.
- Black buttons: Small for the eyes, larger for the mouth.
Steps to Craft Your Ghosts:
- Wrap the Cone: Start by wrapping the thread around each cone until it’s completely covered in white.
- Add the Face: Use black buttons to create the eyes and mouth. Attach them with glue or thread.
- Display: Arrange your button ghosts on a mantle, shelf, or tabletop for maximum spooky impact.
Why Kids Love It:
This craft promotes creativity and fine motor skills, making it a hit with children under 10. Plus, the final product is adorable and fun to display around the house.
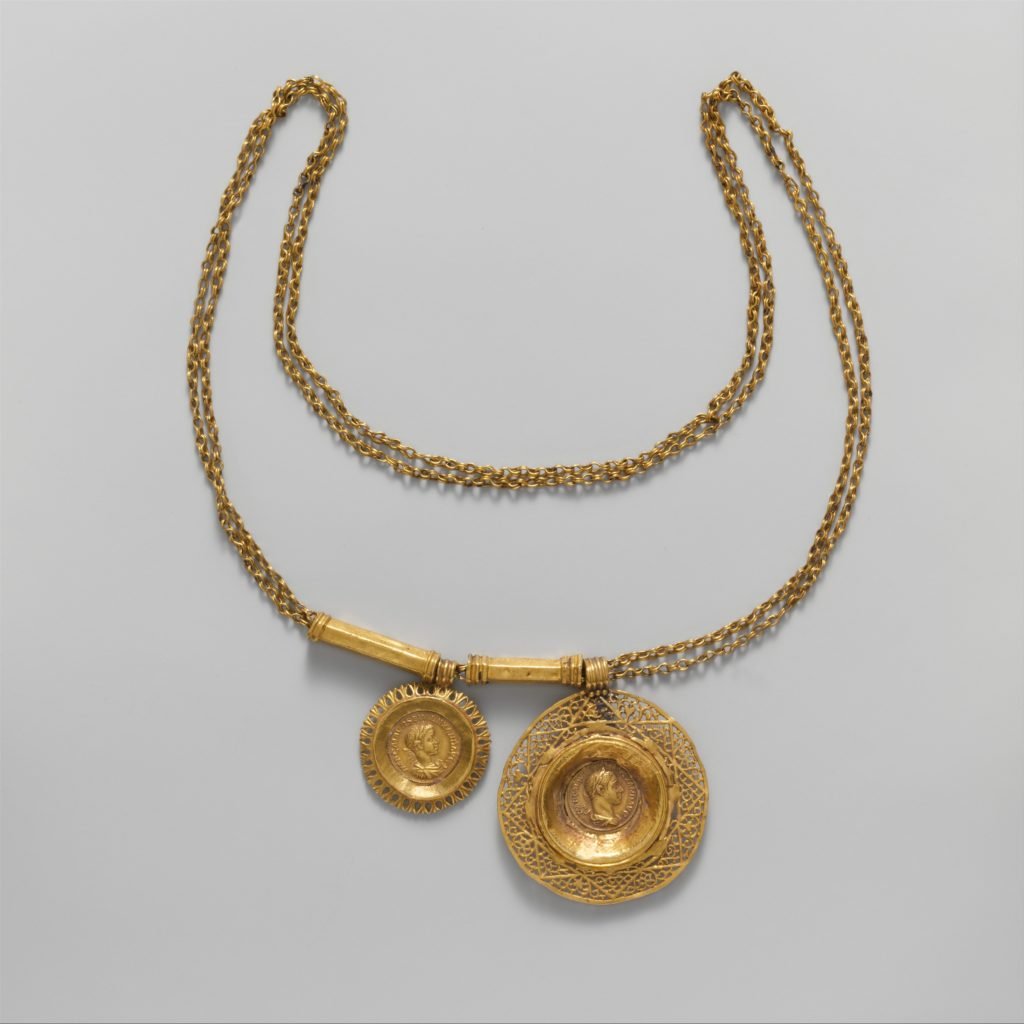
4. Coin Charms
Vintage metal buttons are treasures waiting to be transformed into unique jewellery pieces. Whether you’re crafting for yourself or as a gift, these coin charms are both elegant and easy to make.
Materials Needed:
- Metal buttons: Look for vintage pieces at thrift stores or antique shops.
- Jump rings: To connect the buttons to your jewellery.
- Chains or bracelet bands: For the base of your necklace or bracelet.
- Pliers: For attaching the jump rings.
How to Make Them:
- Attach Jump Rings: Use pliers to secure a jump ring to each button.
- Connect to Chains: Link the buttons to your chosen chain or bracelet band.
- Customise: Experiment with layering buttons or combining shiny and matte finishes for a more eclectic look.
Expert Advice:
Jewellery designer Elena White suggests: “Mixing materials, like pairing metal buttons with leather bands, creates a modern yet timeless accessory.”
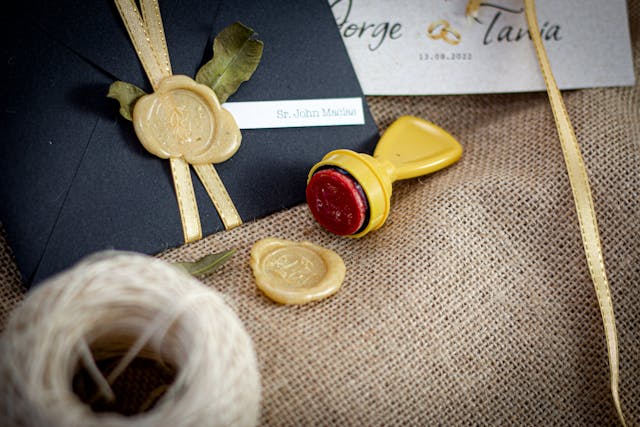
5. Wax Seal Stamps
Add a touch of elegance to your letters or gift wrapping with DIY wax seal stamps made from vintage buttons. This project is a nod to the past but fits beautifully into today’s handmade aesthetic.
What You’ll Need:
- Vintage buttons: Look for intricate designs.
- Candle wax: Available in various colours.
- Hot glue gun: For securing the button.
- Wooden dowels: To create a handle.
Steps to Create Your Seal:
- Attach the Button: Glue the button to one end of the wooden dowel.
- Melt the Wax: Light a candle and let the wax drip onto your letter or package.
- Stamp: While the wax is still soft, press the button stamp into it and hold for a few seconds.
Historical Insight:
Wax seals were used in medieval times to signify authenticity and security. Today, you use it to add a unique, personal ad decorative touch to your correspondence.
6. Quick Bookmarks
Bookmarks are a practical craft that you can whip up in minutes. Whether you’re an avid reader or need a quick gift idea, button bookmarks are a charming solution.
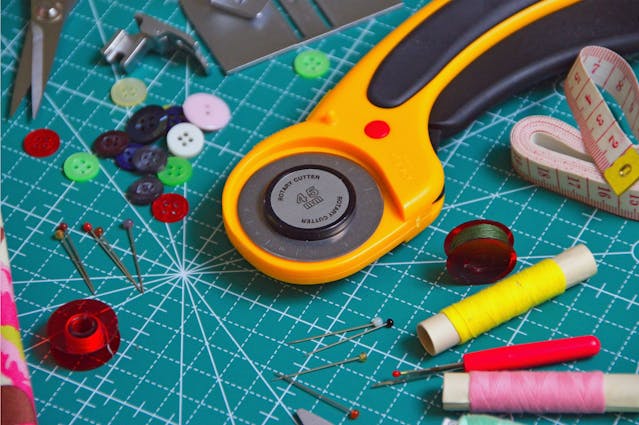
Materials:
- Large paperclips: The base of your bookmark.
- Buttons: Colourful and eye-catching.
- Felt: For a neat finish.
- Hot glue: To hold it all together.
Instructions:
- Glue the Button: Attach a button to the top of the paperclip using hot glue.
- Add Felt: Cut a small piece of felt and glue it to the back of the button for added durability.
- Dry and Use: Allow the glue to set before using your bookmark.
Why It Works:
These bookmarks are not only functional but also customizable. They make thoughtful gifts for book lovers and can be tailored to suit any personality or theme.
7. Button Tree
If you love the idea of bringing a touch of nature into your home, this button tree project is a perfect starting point. It’s simple, fun, and ideal for creating wall decor or handmade greeting cards. Plus, it’s a great project to do with kids or as a relaxing solo activity.
Materials Needed:
- Brown cardstock paper
- Light blue cardstock paper
- Assorted buttons (green, orange, yellow, or multicoloured)
- Glue
- Scissors
Step-by-Step Instructions:
- Create the Tree Trunk: Cut out a tree trunk shape from the brown cardstock paper. You can keep it simple with a straight trunk or add branches for more detail.
- Background Setup: Glue the trunk onto the light blue cardstock paper. This will act as your background, giving the tree a “sky” to stand against.
- Add the Leaves: Using assorted buttons, glue them above the trunk to mimic leaves. For a seasonal twist:
- Use orange and red buttons for a fall-inspired look.
- Stick with green buttons for a lush spring tree.
- Mix in white and metallic buttons for a magical winter scene.
- Personalise It: Add extra details like birds, clouds, or a sun using other materials like felt or stickers.
Creative Twist:
For a winter wonderland vibe, swap out the green and orange buttons for silver and white ones. Metallic buttons can add a touch of sparkle, making your tree look like it’s covered in frost.
Why It Works: This craft is a wonderful way to upcycle leftover buttons while creating something uniquely personal. Plus, it’s versatile enough to suit any season or occasion.
8. Rainbow Button Craft
Skill Level: Intermediate
Rainbows never fail to brighten up a room or bring a smile to someone’s face. This colourful button craft is great for teaching kids about colours while creating something visually stunning. It’s slightly more detailed than the button tree but still easy to complete with basic materials.
Materials Needed:
- Blue cardstock paper
- Assorted buttons in rainbow colours (red, orange, yellow, green, blue, indigo, violet)
- White foam sheets or cotton balls (for clouds)
- Glue
Step-by-Step Instructions:
- Prepare Your Base: Use the blue cardstock paper as the background to mimic the sky.
- Arrange the Buttons: Lay out your buttons in the shape of a rainbow arc. Follow the colour order: red, orange, yellow, green, blue, indigo, and violet.
- Glue Them Down: Once you’re happy with the placement, glue each button in place. Be sure to let the glue dry before moving the project.
- Add the Clouds: Cut out cloud shapes from the white foam sheets or use cotton balls for a fluffier look. Glue these at either end of your rainbow.
Did You Know?
The colours of the rainbow—red, orange, yellow, green, blue, indigo, and violet—are often remembered with the acronym ROYGBIV. Crafting a button rainbow can be a fun and interactive way to teach kids this concept.
Why It’s Special: This craft is as educational as it is beautiful. It’s perfect for hanging in a child’s room or giving as a cheerful handmade gift.
9. Spooky Button Skull
Skill Level: Advanced
When Halloween rolls around, spooky crafts are a must. A button skull is a striking decoration that’s sure to catch everyone’s eye. While this project requires a bit more precision, the result is well worth the effort.
Materials Needed:
- Black cardboard
- White buttons (assorted sizes)
- Black buttons (for details)
- Glue
Step-by-Step Instructions:
- Outline the Skull: Draw a simple skull outline on the black cardboard. You can freehand it or print out a template to trace.
- Fill in the Skull: Glue white buttons inside the skull outline. Start with larger buttons to cover bigger areas, then use smaller ones to fill gaps.
- Add Details: Use black buttons to create the eye sockets, nasal cavity, and teeth.
Expert Advice:
“The contrast of black and white buttons creates a dramatic and eerie effect,” says craft blogger Emily Hart. “Don’t be afraid to experiment with button sizes and placements for a more dynamic look.”
Why It’s a Hit: This craft is perfect for adding a spooky yet stylish touch to your Halloween decor. Hang it on your wall or display it on your mantel for an instant conversation starter.
10. Christmas Tree
Skill Level: Easy
Bring the holiday spirit into your home with a button Christmas tree. This project is simple enough for kids but festive enough to delight adults, too.
Materials Needed:
- Green buttons (various sizes)
- Star embellishment
- Glue
Step-by-Step Instructions:
- Build the Tree Shape: Arrange green buttons in a cone or triangle shape to mimic a Christmas tree.
- Layer the Buttons: Start with larger buttons at the base and gradually use smaller ones as you work your way up.
- Add the Star: Finish your tree by glueing a star embellishment at the top.
Interactive Idea:
Turn this into a family activity by creating multiple button trees and using them as ornaments for your real Christmas tree.
Why It’s Joyful: This craft captures the magic of Christmas while providing an opportunity to bond with loved ones. Plus, it’s a fantastic way to use up green buttons you’ve been saving.
Learn More: Wine Bottle Crafts and Upcycling Ideas: A Guide to Sustainable Creativity
11. Tool Holders
Skill Level: Beginner
Even everyday items can benefit from a touch of creativity. Redesign your tool holders by decorating them with buttons.
Materials Needed:
- Plain tool holder (fabric or plastic)
- Assorted buttons
- Glue
Steps:
- Choose a design, like a flag or geometric pattern.
- Glue buttons onto the tool holder in your chosen arrangement.
- Let the glue dry completely before using.
Why It’s Practical: Button-decorated tool holders are not only visually appealing but also provide extra grip, making them functional and fun.
12. Button Fridge Magnets
Skill Level: Beginner
Add a touch of whimsy to your kitchen with button fridge magnets. These little pops of colour are quick to make and highly practical.
Materials Needed:
- Magnets
- Buttons (various colours and sizes)
- Hot glue
Steps:
- Attach magnets to the back of buttons using hot glue.
- Allow the glue to dry completely.
- Use your new magnets to decorate your fridge or hold up notes and photos.
Fun Fact:
Button fridge magnets make excellent stocking stuffers during the holiday season. They’re inexpensive, customizable, and always appreciated.
Conclusion
Buttons may seem small and simple, but their potential for creativity is limitless. From functional items like bookmarks and magnets to decorative pieces like globes and Christmas trees, button crafts are a fun way to repurpose old materials. Gather your supplies, let your imagination run wild, and start creating today!
Actionable Tips:
- Host a button craft night with friends or family.
- Explore thrift stores for unique vintage buttons.
- Share your creations on social media to inspire others.
Happy crafting!